Showing posts with label Projects. Show all posts

6.25.2015

this is how our garden grows

"There are blessings in being close to the soil, in raising your own food, even if it is only a garden in your yard and/or fruit tree or two. Man's material wealth basically springs from the land and other natural resources." -Ezra Taft Benson

Back in the fall, we had a lesson on self-reliance in church. I felt very inspired and prompted that we should make an effort to do a garden this year. It has been a lot of work. But I think that's the beauty of it. Work. I can't ever expect my children to learn to work hard if they don't learn from my example.

It took us a while to finally get these raised garden boxes built. Brandon gets all the credit for those. He did such a good job.
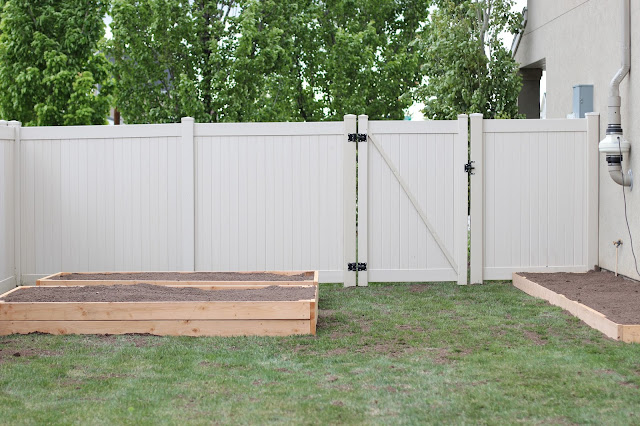


And then we finally got some veggies planted: tomatoes, cucumbers, potatoes, peppers, pumpkins and watermelon. We hope they all grow well this year! 


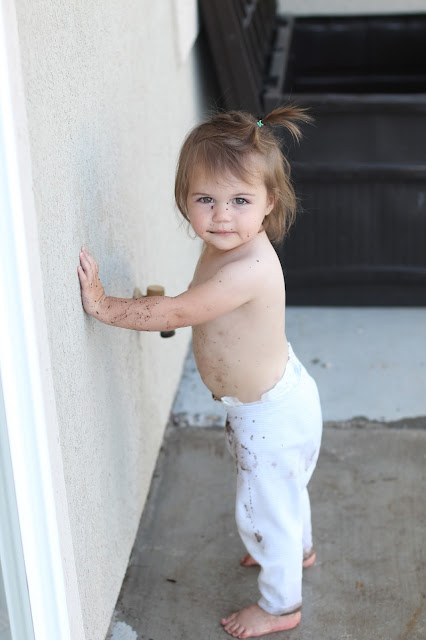
That is if we can keep this little girl from picking all the plants before they grow. She ain't afraid of mud, that's for sure! 


9.29.2014

behind the scenes of a recent project

This blog has been slacking a little. It's because I've been scrambling to finish up a project that has been in the works for years now!

Every year I forget how much I love Halloween. So I put together 31 Days of simple Halloween ideas that combine traditions and recipes from my mom as well as some of my own.


Blake has been my little assistant while Evelyn naps. And I have to say he has really come to love Halloween already! We have had lots of fun together. Here's a sneak peek of some of the fun we'll be sharing...


If you'd like to follow along, head over to So Festive! for a new idea posted daily from now until Halloween. 

If you've missed the first few posts, you can catch up here: 

6.22.2014

prepared, not scared

Our stake has been emphasizing preparedness this year. I've had multiple quiet promptings the last few months to get prepared. I've been slowing stocking up on water and extra food storage, but haven't done much more than that.

With the recent earthquake that happened near us in Centerville, it was another prompting to get into gear. The day after, I went to the store and got all the stuff we needed for 72-hour food kits. I adjusted the menu to make it a bit more healthy and things that we would eat. (As in no spam!)

I would still like to find better containers to fit it all in and I need to keep working on the rest of our 72-hour kits, but at least it's a start. I'm feeling much better. And much more prepared.


Here's the menu:
(I may add in some oatmeal packets and switch out other things, but I went for sale items. I figure we'll be rotating these every 6 months or so I can watch for good deals)

Day 1:
Breakfast: Hot chocolate + Raisins + Protein Bar
Lunch: Applesauce + Ramen + Capri Sun
Dinner: PB crackers + V8 juice + fruit roll-up
Snack: raisins + protein bar

Day 2:
Breakfast: Hot chocolate + protein bar
Lunch: Ramen + raisins + fruit roll up
Dinner: Chili + Capri Sun
Snack: applesauce + V8

Day 3:
Breakfast: Hot chocolate + protein bar
Lunch: Ramen + fruit roll up
Dinner: Canned turkey + capri sun + raisins
Snack: applesauce, raisin + cookie and nutella packets

3.02.2014

snapshot sunday

A few Sundays ago, I woke up with terrible knee pain. I couldn't bend. stand, or walk on it. It was so bad that I missed church and went to Instacare to figure out what was going on. 


They gave me a brace and told me to go to a specialist. Brandon insisted that he take a picture of me and the hot shorts I had to wear while they checked it out.


I received a blessing that it would heal quickly and I would be able to do what I needed to. That was reassuring since I was worried about how I would do stairs, carry children, and get anything done if I couldn't walk.

2 weeks later, my knee is completely back to normal. Such a blessing. I'm also grateful to my dad, Brandon's mom, and his sister Jess who helped with Blake and Evelyn and did grocery shopping for me and a kind lady down the street who brought us a meal.


This week it was nice enough weather to have our first backyard picnic! We stayed outside nearly all day long.


And once the children were napping, I was able to do a quick spray-paint project. We have this awesome on-line yard sale group in this area and all day long people are posting new things. One night, a lady posted a free dresser. Well, I love a good deal, so I picked up the dresser the next day.

Wicker isn't really my favorite, but you can't beat free. It's perfect for Evelyn's room right now.


I love making our house more of a home. Slowly and surely.

2.23.2014

sochi 2014 olympics

The Olympics ended today. I was certain I would watch them non-stop. I absolutely LOVE the Olympics. But for some reason (maybe because life happens or because I'm not very good at just relaxing), I didn't watch near as much as I thought I would.

At least we had a celebration during the Opening Ceremonies.  It was just our little family. Perfect. Since Brandon served his mission in Russia, he taught us all how to make Pilmini.

Here's how he did it: (with our help here and there). And he even documented it.

1. Make a nice, soft dough.


2.  Make a mixture of onions, pork, and beef. 

3. Roll out the dough. Cut it in small circles and fill each one with meat mixture. 


4. Freeze for 20 minutes. 

5. Boil for 20 minutes. Eat with sour cream or ketchup. 


In other cool news, Brandon was asked to come up with Olympic-themed Russian words for a "Word-Of-The-Day" that ABC-4 Utah (local news channel) wanted to air during the Olympics. So each day during the Olympics, we would watch a clip of him sharing the Russian word for that day. He did really well and he was grateful for the opportunity to get to use his Russian.


6.10.2013

how does our garden grow?

We finally got our garden in over the weekend. Let's hope it's a good year! I'm crossing my fingers that I can keep my flowers alive the entire season. B is doubtful, for good reasons. I haven't had much success in the past. It's a tradition to try one new plant each year. This year, the Lumina pumpkin is our experiment. We also planted lots of tomatoes, cucumbers, and a pepper plant.


My favorite part of the experience is picking out plants at the garden store. I wish I had our own house (and a fortune!) to landscape our yard really pretty, but someday, maybe? I'm just grateful we do have a yard and a garden spot to perfect our green thumbs before we really have our own place.

11.07.2012

before & after: wall photo collage

A few of you asked about this, so here goes...The wall above our kitchen table needed a spruce up. The black table we refinished along with the black frame was a little to, well, black and boring. So I finally decided to jump on the wall collage bandwagon to brighten things up.

Before


I used my birthday quarters  to purchase frames from yard sales and thrift stores. I tell you what, yard sales are the way to go. People are so desperate to get rid of their junk, they will usually make you a pretty good deal. I got many of the frames for less than a dollar. All of the frames, including some I have had for a few years, cost me $8.

I had a few rules as I searched for frames. 1. Don't buy any black frames because it would be hard to make them white.  2. All of the frames had to have a hook on them to hang. 3. Find a variety of frames that will add character. It would be too hard to find all similar frames, so I looked for ones with different edges and textures.

As soon as I found all the frames, I spray painted them white. It took a few coats. I used Wal-mart spray paint that cost me $1 a can. It took about 2.5 cans to spray all of them a few times. So total for the project was $11!


The next thing I did was something I cannot take credit for. I traced all of the frames onto paper bags (in fact the same ones I sprayed them on). I cut the shapes out and then taped them on the wall. This allowed me to change things around before I made it final with the nails.  I left it up for a few days just to make sure I was going to like it. I change my mind quite a bit, you know :)


Brandon is the perfectionist in our family, so I made him help me pound the nails. I'm so happy with how it turned out! (*The small oval frame contains my mom's cross-stitched holiday cookie jar lids. I love having her art on the wall to remind me of her and her love for the holidays.)

9.25.2012

before & after: $20 living room spruce up

I love change. Especially when it comes to decorating. That is why my style is to keep things fairly neutral and add pops of colors so when I get tired of things, I can change the look easily. I've done things here and there to our living room, but I finally changed up the color scheme and finished it off.

It's fun to look back and see how much my tastes have changed over the years.
Our first living room in Provo looked like this:

Then when we moved, it looked like this: wow. it was drab.

Then when I needed a little color, it went to this: I went through an orange phrase.

Then to this: updated coffee table and desk, but lots of random colors.


And finally this: a little more continuity.
(and keep in mind, our house is never this clean on a daily basis. just keeping it real!)

I sold our coffee table for $35 and bought this one for $40. For another $15, I got the fabric for pillows, turquoise pillow, a can of spray paint, circle mirror, and a few picture frames. All of the fun for me comes from doing it cheaply. So even though it will never be featured in a magazine, that's okay because I didn't have a huge budget to work with. And knowing me, I'll probably change it again, especially since the holidays are coming up. 

8.12.2012

before & after: storage room

Our storage room has needed some definite TLC for a long time. In fact, it was getting so bad that we avoided going in like the plague. As soon as I found these shelves, we got right to work.

Before

After

Amazing what two shelves and some de-junking can do to a room. Let's hope we can keep it this organized.

4.26.2012

blake's room...on a budget

I know Blake could care less what his room looks like. That is why for the first few weeks he slept on and off in a swing or in his pack n' play in the corner of our room. Quickly realizing we would get no sleep if we continued sharing a room, we moved him to his own. It has been a work in progress for the past few months. When we finally got a crib, I cracked down and finished decorating his room. Keep in mind, we are renting so we couldn't paint and everything I did was for my sake. I spend lots of time in there and it has become one of my favorite places to be. It is so peaceful and heavenly. By finally getting things organized and together, it continues to be my little sanctuary.

The one rule for myself was: I couldn't spend any additional money on decorating (besides the few things we had bought before he was born).  This forced me to get creative, but again, Blake could care less. And there is something fun about being frugal. So here goes...

$5 bookshelf we painted last summer. white baskets thrifted $4. picture frames thrifted $4. pottery barn copy-cat rocking chair $80 new off KSL. used gift card to buy slip cover. pillow $2 from garage sale. i am a child of god print and frame gifted.

clock from Kohl's years ago. IKEA plant. lamp a friend was giving away. tricycle thrifted $1. frames repainted and/or won. basket was gifted. 

dresser free from Brandon's parents (we painted it). crib free from a friend. bedding is dwell studio.

And here it is all together!

And us chilling on the nursery floor. I'm sure this is the first of many self portraits we'll be taking together. From the looks of it, Blake seems excited.

4.16.2012

before & after: patio set

A few weeks ago, Brandon picked up this awesome (and cheap!) patio set on his way home from work. Do I have a good husband or what? I love that he is always up for my crazy projects. I have really been wanting a patio set so we could eat outside without having to drag our card table out each time. When I saw that this entire set would be $25, I knew we couldn't go wrong.

This is the before...everything in good shape minus a little rust on the chairs, but you know me, I can never leave anything alone. Plus, half-- if not all-- the fun is painting.

The hardest part of the entire project was deciding on a color. I wanted something bold and spontaneous. So this is what we decided on-- Krylon Smoke Gray and Sun Yellow. I was happy to see that Krylon now has paint + primer in one. And it prevents and protects from rust. It was perfect for furniture that will get lots of weather.


After a good scrub down, and a few coats of paint, we have a happy little patio set. If I would have been thinking straight, we should have kept the chairs gray (since they were already gray) and done the table yellow and we would have used a LOT less paint. But, we are still happy with how it turned out. (And yes, the bottom of the chairs still need one final coat, but don't tell anyone.) We now eat outside any chance we get. And can I just say how happy those yellow flowers are? They were my first attempt at planting bulbs. So glad they actually bloomed!


8.22.2011

Before & After: Yellow Desk

Remember this desk that I found off KSL for free?


It sat in our garage for a few weeks while we wrapped up our table and took a break from projects.

We finally picked out a color and worked like busy little bees on Saturday. 
Now it sits happily in our little apartment.
And it makes us happy just looking at it.


Related Posts Plugin for WordPress, Blogger...